post

NetApp MetroCluster Overview – Part 3 – Fabric-Attached MetroCluster


What is Fabric-Attached MetroCluster?

A Fabric-Attached MetroCluster configuration can be implemented for distances greater than 500 meters connects the two storage nodes by using four Brocade or Cisco Fibre Channel switches in a dual-fabric configuration for redundancy. Each site has two Fibre Channel switches, each of which is connected through an inter-switch link to a partner switch at the other site.

The inter-switch links are fibre connections which extend the storage fabric path so that it provides a greater distance between nodes than other HA pair solutions. By using four switches instead of two, redundancy is in place to avoid single-points-of-failure in the switches and their connections.

The advantages of a fabric-attached MetroCluster configuration over a stretch MetroCluster configuration include the following:

  • Increased disaster protection via nodes being in separate geographical locations
  • Disk shelves and nodes are not connected directly to each other, but are connected to a fabric with multiple data routes ensuring no single point of failure.

The disadvantage is that there’s more cabling and there’s more components involved in the way of fibre switches.

Fabric MetroCluster requirements

Read More

post

NetApp MetroCluster Overview – Part 2 – Stretch MetroCluster


What is a Stretch MetroCluster

To understand Stretch MetroCluster you first need to understand how a HA pair operates. A Stretch MetroCluster is basically the next level up from a HA pair, or a HA Mirrored pair to be more specific.

Standard HA Pair

In a HA pair, which is a very common Netapp controller deployment, the cluster can handle the outage of a physical link or the entire controller and still provide access to the underlying storage without impacting data access for end users. Each controller in the HA pair shares the same set of disks or own its own distinct set of disks but either way in the event of a controller failure all reads/writes are sent to the remaining controller that can still access the failed controllers disks. There is a HA interconnect between the controllers that’s used for both keep-alive monitoring and mirroring of NVRAM. The HA pair provides fault tolerance and allows non-disruptive upgrades as a takeover and giveback can be performed for planned migration of read/writes to second controller in the HA pair.

Next up is a Mirrored HA pair. Mirrored HA pairs maintain two copies of all data in the form of plexes. These are continually updated synchronously using SyncMirror and provides protection in the event of disk failures. You can also set the mirroring to be asynchronous if there is a need for that. The major drawback to Mirrored HA pairs is that it does not provide failover to the partner node in the event of a controller failure. The Mirrored HA controller pair need to be within the 5 metre SAS limit.  This is where stretch MetroCluster comes in.

Read More

post

NetApp MetroCluster Overview – Part 1 – What is MetroCluster?

During the past couple of years I’ve been working on Flexpod solutions and even more recently than that I’ve been exposed to NetApp Flexpod MetroCluster. This has led me to doing quite a bit of research and reading about MetroCluster solutions and I thought I’d share some of that knowledge.I wanted to put together a post to help anyone else that needs to get a better understanding of MetroCluster infrastructure. It kind of got out of hand a bit and to make it easier to read I’ve split it out into a number of parts


MetroCluster is a term that is often heard but I believe rarely understood. It adds some extra complexity into every aspect of the infrastructure but from my own technical bias I love that as it gives me something else to learn and play with.

Multiple different vendors now provide a MetroCluster or metro-availability solution but my focus is on NetApp and in particular 7-Mode MetroCluster. Any reference I make to MetroCluster from here on will only be in reference to NetApp MetroClusters. If your clients or company value disaster avoidance, business continuity, fault tolerance and overall infrastructure resilience then you really need to look at a MetroCluster solution. You will also need to have some deep pockets.

As the engineer supporting such solutions and performing disaster recovery tests I can attest to the power of a MetroCluster solution that can attain zero downtime and data resilience. Even in one instance where I almost brought it to its knees it still soldiered on.

What is a MetroCluster? Read More

post

NetApp DFM Snapshot Management – Remove Orphaned snapshots

Orphaned Snapshot Removal – Identify Orphans

I’ve been banging my head against the screen for the past few weeks looking at storage issues and finding orphaned volumes with reams of snapshots using up valuable disk space. In some cases it was due to manual intervention and a snapmirror or snapvault relationship was broken, in others it was caused by DFM creating new instances of the volume but not cleaning up old volumes and associated snapshots and in other cases, well I’ve no idea how they occurred. Hence why I’ve been slapping my brain around the inside of my skull. I’d be interested to know if this is still an issue with OCUM, answers on a postcard.

There’s no pretty way to clean up orphaned snapshots that are essentially owned by DFM. It’s messy, convoluted and requires that you’re very careful and precise about what you’re removing otherwise you’ll make things worse. There are a number of reasons why orphans can occur. One is down to  the way SnapProtect and the DFM work together. If a VM is deleted or moved to another volume and no other VM’s that are a part of that same backup subclient exist on that volume the snapshots will not age and will require a manual clean-up process. This seems to limit the use of automated DRS in VMware, but that’s a separate issue really. Another reason, and what looks to be the cause in my case, is that DFM has intermittent issues communication to the storage controller and thinks the volume doesn’t exist so it DFM may create a FlexClone of the volume and index it to have a new suffix while still being able to access the snapshots that were already captured. This can be caused by network drop outs out by the controllers or the CPUs maxing out and not being able to reply to DFM. I’m still investigating the cause of this. If a new storage policy was created in SnapProtect with these volumes assigned it would clear out the orphans but that would involve re-baselining the backups which is not something you’d want to do, unless of course that data had to value to you.

Read More

post

How-To: NetApp SnapProtect – Service Pack Upgrade

Oh SnapProtect, how you taunt me! It’s one of those products that’s been OEM’d from another vendor so it’s missing some functionality and also means that the documentation specific to it can be sparse. Commvault documentation most likely will be sufficient but ideally there would be documentation would exist on how to perform Service Pack upgrades specifically for SnapProtect. I have a few issues with SnapProtect but I’ll leave that rant for another time. When it came to recently upgrade SnapProtect I had the issue of not finding documentation that would clarify the process so I thought I’d capture it so I can at least return to it in the future if I need to. Below are a list of steps carried out to perform the upgrade. I understand that the media agent upgrade may be flawed, and in my case I couldn’t get it to work correctly, so if someone knows what I’ve done wrong please feel free to leave a comment. I’m not an expert in either SnapProtect or its cousin Commvault. For the vast majority of SnapProtect admins this document may be superfluous but hopefully someone finds it useful.

Pre-Upgrade Task

1. Open a preemptive support case with Netapp

2. Download the software from NetApp support site, copy the installation file to the local drive on the server. The software can be access here with a NetApp login – mysupport.netapp.com/NOW/cgi-bin/license.cgi/download/software/snapprotect/10.0SP11/download.shtml

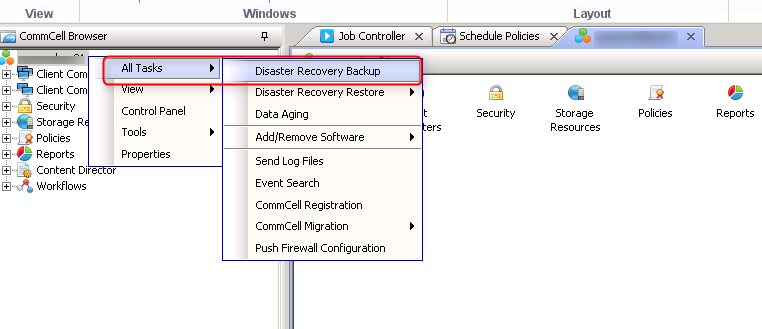
3. Open the SnapProtect Administrative console on the CommServe/SnapProtect Server. In the console right-click on the commserve, select All Tasks and take a backup of SnapProtect using Disaster Recovery backup.

snapProtect-upgrade step 1

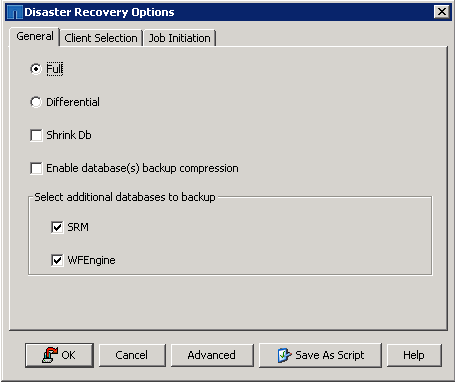
Select the option as a Full backup and click Ok

snapProtect-upgrade step 2

4. Find the SET_XXX folder, in this case in the SnapProtectDR folder and zip it.

snapProtect-upgrade step 3 Read More

post

HowTo: vROPS – Blue Medora Cisco UCS and NetApp Management Pack installs

Following on from installing vROPS a few month back I finally made the jump to install the Blue Medora management packs for both Cisco UCS and NetApp to get greater visibility into my virtual environment and the underlying physical infrastructure. I’m really looking forward to seeing what these management packs have to offer. While I’m not going to cover off the dashboards provided by the management packs in this post it is something I plan on revisiting once it’s been in use for a while and I’ve done a bit more playing around with it. The reason I’m posting this deployment process is that despite Blue Medora having decent installation guide it’s not always 100% clear, so I’ve done this to hopefully help guide a few others through the process a bit easier.

Cisco UCS Management Pack Deployment

Before you begin this deployment you can download trial versions from Blue Medora and if you want a permanent installation purchase some licenses from Blue Medora.

1: In vRealize Operations Manager go to the Administration -> Solutions

Blue Medora UCS Management Pack Install Step 1 Read More

post

The Life of NetApp – Bring out your dead!

There’s a quality scene in Monty Python’s Life of Brian where the dead are being called out to be loaded onto a cart to be taken away. Are new players in the market doing the same to NetApp? Even though they continue to say that they’re not dead everyone is writing them off and chucking them on the death-cart.

It’s easy to see why NetApp is being called to bring out its dead. There’s more and more players appearing in the storage market with serious differentiators to NetApp. Just look at the list of potential competitors like Pure Storage, Tintri, SimplivityNutanix and Nimble. And that’s not including the fully software defined storage groups such as Maxta, Stratoscale and a host of others. There’s also the old adversary EMC. All of these vendors have released new and innovative products in the past year and they have managed their marketing message far better than NetApp has. NetApp has been painfully slow at getting a smooth transition in place for its 7-Mode customers to Cluster Data OnTap (C-Dot). A lot of critics of NetApp also point to the fact that they are so heavily reliant on the OnTap software. I personally don’t see an issue with that reliance. Don’t change something just to create a new release for the sake of it. But the marketing message and the perception by the community of NetApp has caused a number of issues for them.

Read More

NetApp – Create a new volume on vFiler (7-mode)

I had to create a new volume on a vfiler recently. This is a fairly straight-forward tasks for long term NetApp admins but I thought I’d write up the process for the next time that I forget. In this example the vfiler already exists and has been exported on a different subnet than the root vfiler, vfiler0. If you’re new to vfilers then you’ll immediately notice that once you change the vfiler context to the vfiler you want to add a volume to that you don’t have the option to create a new volume. The new volume needs to be created at the root vfiler level and then assigned to the vfiler you wish. In this example I am create a new ISO datastore on a vfiler context so that one of our tenants can have their own ISO datastore. We could present out the ISO datastore from vfiler0 but that would break the security model we worked hard to put in place.

The first thing to do is change the vfiler context and then run the vol command. You will see from this that it’s not possible to create the volume directly on the vfiler.

vfiler context <tenant-vfiler>
tenant-vfiler@NTAPcontroller> vol
The following commands are available; for more information
type "vol help "
offline             options             restrict            status
online
tenant-vfiler@NTAPcontroller> vol create iso01 aggr1 200g
vol: No such command "create".
The following commands are available; for more information
type "vol help "
offline             options             restrict            status
online

So go back to the parent vfiler, vfiler0, and then create the new volume. From there you can add it to the tenant-vfiler. Before transferring the volume to the tenant-vfiler I have also changed the options to make the volume thin provisioned using the “guarantee none” setting and also set fractional_reserve to 0. The commands used to create the new volume, modify the settings and add it to the tenant-vfiler were:

tenant-vfiler@NTAPcontroller> vfiler context vfiler0
NTAPcontroller> vol create iso01 -s volume aggr1 200g
NTAPcontroller> vol options iso01 guarantee none
NTAPcontroller> vol options iso01 fractional_reserve 0
NTAPcontroller> vol status iso01
  Volume State          Status            Options
  iso01 online          raid_dp, flex     create_ucode=on, convert_ucode=on,
                        mirrored  guarantee=none, fractional_reserve=0
                        64-bit
                        Volume UUID: 0df82cec-fdb8-11e4-a27a-123478563412
                Containing aggregate: 'aggr1'

NTAPcontroller> vfiler add tenant-vfiler /vol/iso01
WARNING: reassigning storage to another vfiler does not change the security information on that storage. If the security domains are not identical, unwanted access may be permitted, and wanted access may be denied.
Tue May 19 09:47:47 EST [NTAPcontroller:cmds.vfiler.path.move:notice]: Path /vol/iso01 was moved to vFiler unit "tenant-vfiler".
Tue May 19 09:47:47 EST [NTAPcontroller:export.auto.update.disabled:warning]: /etc/exports was not updated for iso01 when the vol destroy command was run. Please either manually update /etc/exports or copy /etc/exports.new to it.
NTAPcontroller>

Read More

NetApp 7-Mode MetroCluster Disaster Recovery – Part 3

This is the last of the 3-part post about MetroCluster failover procedure. This section covers the giveback process and also a note about a final review. The other sections of this blog post can be found here:

  1. NetApp 7-Mode MetroCluster Disaster Recovery – Part 1
  2. NetApp 7-Mode MetroCluster Disaster Recovery – Part 2

Test Case 4 – Virtual Infrastructure Health Check

This test case covers a virtual infrastructure system check, not only to get an insight into the current status of the system but to also compare against the outcomes from test case 1.

4.1 – Log into vCenter  using the desktop client or web client. Expand the virtual data center and verify all SiteB ESXi hosts are online

4.2 – Log onto NetApp onCommand System Manager. Select primary storage controller and open application

4.3 – Expand SiteA/SiteB and expand primary storage controller, select Storage and Volumes. Volumes should all appear with online status

4.4 – Log into Solarwinds – Check the events from the last 2 hours and take note of all devices from Node List which are currently red

Read More

post

NetApp 7-Mode MetroCluster Disaster Recovery – Part 2

This is the part 2 of the 3-part post about MetroCluster failover procedure. This section covers the giveback process and also a note about a final review. The other sections of this blog post can be found here:

  1. NetApp 7-Mode MetroCluster Disaster Recovery – Part 1
  2. NetApp 7-Mode MetroCluster Disaster Recovery – Part 3

The planning and environment checks have take place and now it’s time to execution day. I’ll go through the process here of how the test cases were followed during testing itself. Please note that Site A (SiteA) is the site where the shutdown is taking place. Site B (SiteB) is the failover site for the purpose of this test.

Test Case 1 – Virtual Infrastructure Health Check

This is a health check of all the major components before beginning the execution of the physical shutdown

1.1 – Log into Cisco UCS Manager on both sites using an admin account.

1.2 – Select the Servers tab, and expand Servers -> Service Profiles -> root -> Sub-Organizations -> <SiteName>. List of blades installed in relevant environment will appear here

1.3 – Verify the Overall status. All blades appear with Ok status. Carry on with the next

1.4 – Log into vCenter using desktop client or web client. Select the vCenter server name at top of tree, select Alarms in right-hand pane and select triggered alarms. No alarms should appear

1.5 – Verify all ESX hosts are online and not in maintenance mode

1.7 – Log onto NetApp onCommand System Manager. Select SiteA controller and open application

1.8 – Expand SiteA/SiteB and expand both controllers, select Storage and Volumes. Verify that all volumes are online

1.9 – Launch Fabric MetroCluster Data Collector (FMC_DC) and verify that the configured node is ok. The pre-configured FMC_DC object returns green – this means that all links are health and takeover can be initiated

DR failover Metrocluster FMDC Read More