post

How To: UCS Director 5.4 Patch 1 update

After the recent upgrade to 5.4 I decided to bite the bullet and upgrade to 5.4.1. Go to the download software portal for Cisco. Download the 5.4.1.zip patch file. I had a number of issue with the download as the checksum didn’t match. I had to take a number of attempts to get the file in-tact. I believe the issue was the ISA that acts as our internet proxy. Death to the ISA!!!!

Once the file has been downloaded copy it to your FTP server. Now it’s time to apply the patch. log onto UCS Director via either the console or SSH using the shelladmin account. Select option 3 to stop all the services.

UCSD upgrade step 1

Read More

post

How To: Cisco UCS Director – 5.3 to 5.4 Upgrade

Cisco announced their release of UCS Director 5.4 back in November. As I’m currently running 5.3 and ran into an issue with a workflow Cisco support recommended upgrading to 5.4. I had a look over the Cisco UCS Director 5.4 Release Notes and there’s a new version of Java and the CentOS operating system are newer in the latest version. Due to this the upgrade procedure for 5.4 is different from previous version. In earlier versions it was possible to upload a patch via shelladmin and it would upgrade the software and database schema in place. 5.4 however requires new appliances to be deployed and a migration of database files etc. to be done between the 5.3 and 5.4 versions.

I really think that Cisco needs to look at using a HTML 5 console in the future as this upgrade path is overly complicated. Considering a lot of companies want you to be on the latest version when opening support calls, including Cisco, it would make sense for them to make it easier to perform the required upgrades.

The primary changes that have caused the modification to the upgrade path are:

  • CentOS version 5.4 to version 6.6
  • Java version 1.6 to version 1.8

Another thing to note is that version 5.54 requires 12GB RAM.

Cisco recommend standing up  the new appliances beside your current UCS Director and Bare-Metal Appliances and performing a migration. In my case there’s a few firewall rule etc already been created for the existing environment so I wanted to keep the same IP addresses and machine names. I changed the IP addresses of the current appliances to be something else within the same subnet and gave the new appliances temporary names but the existing IP addresses. Once everything had been migrated and the changes confirmed I was able to rename the appliances to be the existing ones and removed the older appliances from the infrastructure. Before commencing the upgrade I also had a sold read over the UCS Director Upgrade 5.4 Guide and the UCS Director Bare-Metal Agent 5.4 Upgrade Guide

Read More

post

How-To: NetApp SnapProtect – Service Pack Upgrade

Oh SnapProtect, how you taunt me! It’s one of those products that’s been OEM’d from another vendor so it’s missing some functionality and also means that the documentation specific to it can be sparse. Commvault documentation most likely will be sufficient but ideally there would be documentation would exist on how to perform Service Pack upgrades specifically for SnapProtect. I have a few issues with SnapProtect but I’ll leave that rant for another time. When it came to recently upgrade SnapProtect I had the issue of not finding documentation that would clarify the process so I thought I’d capture it so I can at least return to it in the future if I need to. Below are a list of steps carried out to perform the upgrade. I understand that the media agent upgrade may be flawed, and in my case I couldn’t get it to work correctly, so if someone knows what I’ve done wrong please feel free to leave a comment. I’m not an expert in either SnapProtect or its cousin Commvault. For the vast majority of SnapProtect admins this document may be superfluous but hopefully someone finds it useful.

Pre-Upgrade Task

1. Open a preemptive support case with Netapp

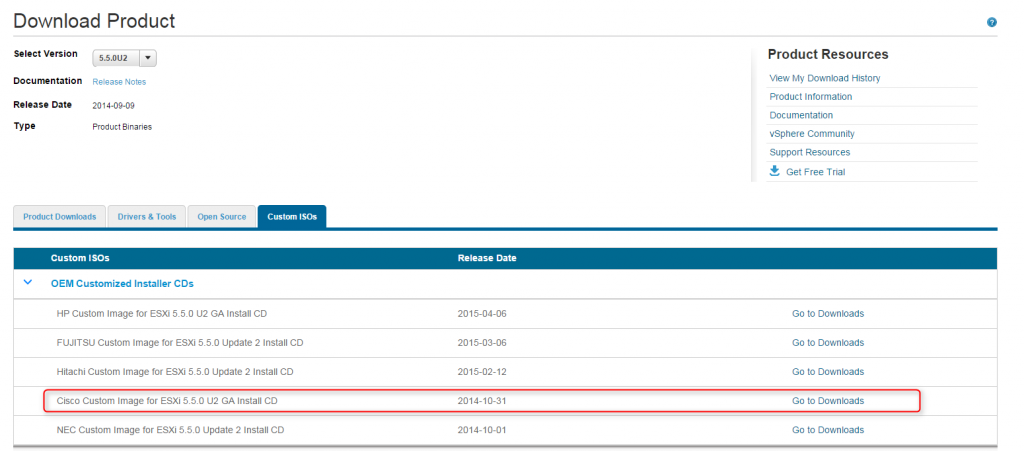
2. Download the software from NetApp support site, copy the installation file to the local drive on the server. The software can be access here with a NetApp login – mysupport.netapp.com/NOW/cgi-bin/license.cgi/download/software/snapprotect/10.0SP11/download.shtml

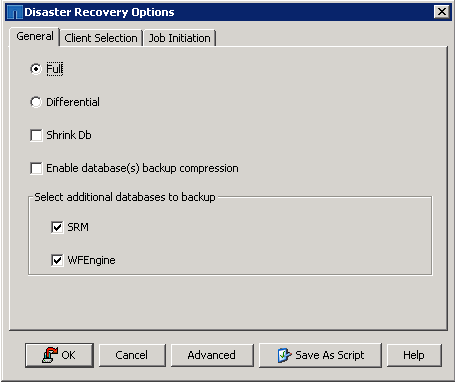
3. Open the SnapProtect Administrative console on the CommServe/SnapProtect Server. In the console right-click on the commserve, select All Tasks and take a backup of SnapProtect using Disaster Recovery backup.

snapProtect-upgrade step 1

Select the option as a Full backup and click Ok

snapProtect-upgrade step 2

4. Find the SET_XXX folder, in this case in the SnapProtectDR folder and zip it.

snapProtect-upgrade step 3 Read More

post

How To: VMware vCenter 5.0 to 5.5 Update 2 Upgrade – Part 6

Other posts in this series:

Step 20:  Upgrade the ESXi hosts using Update Manager

20.1: The first step to carry out is to create a new baseline with the ESXi image. To do this go to Update Manager from the home page on the vSphere client

vCenter Upgrade Update Manager

20.2: Click on the ESXi Images tab as you’ll need to upload the image before configuring a new baseline. Select Import ESXi image

Update Manager Import ISO Image

20.3: Select the ESXi image that was downloaded earlier and click Next
Update Manager Import ISO Image Select Image Read More

post

How To: VMware vCenter 5.0 to 5.5 Update 2 Upgrade – Part 5

Other posts in this series:

Step 19: Post Installation tasks

Issue 1 – SSO access for admins

19.1: Give permissions to admin users for access to SSO. Log into the web client as the administrator account.

vSphere Web Client

19.2: Select Administration and then expand Single Sign-On. Select Users and Groups and select the groups tab. From here you can select Administrators

vSphere Web Client SSO Setup

19.3: Select Add member

vSphere Web Client SSO Add Member

19.4: Select the required domain from the drop down menu

vSphere Web Client SSO Add Group Read More

post

How To: VMware vCenter 5.0 to 5.5 Update 2 Upgrade – Part 4

Other posts in this series:

Step 13 : Upgrade SRM

13.1: Upgrade the SRM server software first and once that has been completed update the SRA. Select the SRM software and run it.

Update SRM 5.5

13.2: Click Ok on the language settings

Update SRM 5.5 Step 2

Update SRM 5.5 Step 3 Update SRM 5.5 Step 4

13.4: Go to C:WindowsSysWOW64 and run odbcad32 and check which server and database the connector is directed to. You can then run the normal 64bit ODBC from Administrative Tasks and add a new connection under System DSN

Click next to continue

Update SRM 5.5 Step 5

13.5: Click Next

Update SRM 5.5 Step 6 Read More

How To: VMware vCenter 5.0 to 5.5 Update 2 Upgrade – Part 3

Other posts in this series:

 Step 10:  Upgrade vCenter Inventory Service on Primary

10.1: Select vCenter Inventory Service and click Install

vCenter Inventory Service installation

10.2: Leave the default language settings and click Ok

vCenter Inventory Service installation step 2

10.3: Click Next on the initial screen

vCenter Inventory Service installation Step 3

10.4: Accept the EULA and click Next

vCenter Inventory Service installation Step 4

10.5: Select to keep the existing data and click next

vCenter Inventory Service installation Step 5 Read More

post

How To: VMware vCenter 5.0 to 5.5 Update 2 Upgrade – Part 2

Other posts in this series:

Step 7 – Unlink vCenter Server

7.1: Go to Start -> Programs -> VMware -> vCenter Server Linked Mode Configuration

vCenter Upgrade Break Linked Mode

7.2: When the configurator opens click on Next

vCenter Upgrade Break Linked Mode Step 2

7.3: Select Modify linked mode configuration and click Next

vCenter Upgrade Break Linked Mode Step 3

7.4: Leave Isolate this vCenter Server instance from linked mode group selected and click Next

vCenter Upgrade Break Linked Mode Step 4

7.5: Click Continue to remove the server from linked-mode

vCenter Upgrade Break Linked Mode Step 5 vCenter Upgrade Break Linked Mode Step 5 part 2 Read More

post

How To: VMware vCenter 5.0 to 5.5 Update 2 Upgrade – Part 1

Following on from a previous bit of work I carried out to convert vCenter from a physical to virtual machine I then had to upgrade vCenter from 5.0 to 5.5 Update 2 to allow the drivers for Trend Micro Deep Security Manager to work on the ESXi hosts. A workaround was tried to just have the ESXi 5.5 filter drivers for Trend installed on the 5.0 hosts but it caused some PSODs on our Dev servers and VMware recommended performing an upgrade of the environment. It was on my to-do list for later in the year anyway so it was good to get the upgrade out of the way. I documented the steps for the upgrade and while once again I didn’t want to create a multi-part blog post the sheer number of steps dictated that it was a requirement. I’ve broken down the posts into a 6-part series covering the below areas:

Step 1 – Planning

1.1: Check Compatibility

The first thing you need to check is that all the components of your environment are compatible with the version of vSphere you want to upgrade to. The first step is this process is to gather the version details of all the installations and plug-ins that you have and use the VMware Compatibility Guide – http://www.vmware.com/resources/compatibility/search.php – to  verify that all the components listed are compatible or at least find out what versions of your products are compatible and seek out information on the upgrade process for each of those components. For example in the below matrix we will be upgrading SRM from 5.0.1 to 5.5.1 to be up to the latest version supported on vCenter 5.5 Update 2. Likewise for the IBM plug-ins and the SRA required for SRM.

Product Current Version Compatible Version
ESXi Host 5.0.0 5.5 Update 2
vCenter 5.0.0 5.5 Update 2
SRM 5.0.1 5.5.1
IBM SRA 2.1.0 2.2.0
Update Manager 5.0.0 5.5 Update 2
IBM TSM TDP 1.1 7.1
IBM Storage Mgmt Console 2.6.0 3.2.2 (supported on 5.5)

There is one other document to be aware of when it comes to planning for the upgrade and that is the upgrade sequence matrix so that you ensure that the correct products are updated at the correct times. This can be found here – http://kb.vmware.com/selfservice/microsites/search.do?language=en_US&cmd=displayKC&externalId=2057795

1.2: Download software vCenter 5.5.0 Update 2d

Go to the following website – https://my.vmware.com/group/vmware/details?productId=353&downloadGroup=VC55U2D

Select the relevant version of vCenter and click on Download Now

vCenter Upgrade Planning Step 1

From here you’ll be prompted to log into the my.vwmare.com account. Log in. Accept the EULA

vCenter Upgrade Planning Step 2

The download will begin. To get the Custom ISOs for Cisco blades for this version go to: https://my.vmware.com/group/vmware/details?downloadGroup=ESXI55U2&productId=353#custom_iso and click Go To Downloads Read More

post

How To: P2V of vCenter Server

I was recently tasked with upgrading a legacy vCenter environment to cater for an upgrade to Trend Deep Security Manager. As I was reviewing the environment I noticed that one of the vCenter servers was a physical server running on an IBM HS22 blade. This server is part of a linked-mode vCenter and as the second vCenter was virtualized it caught me by surprise that this one wasn’t. Before beginning the work to upgrade vCenter from 5.0 to 5.5 and all its component I decided to virtualize the physical vCenter server to make management easier down the road and to eliminate the reliance on physical hardware outside of the ESXi hosts themselves.

As all ESXi hosts were being managed by the vCenter I was trying to convert I had to remove on host from the production cluster and isolate it so that it could be managed independently and could be used as the destination for the P2V in the vCenter Standalone Converter.


PREPARATION:

Step 1: Download vCenter Standalone Converter 5.5 from VMware site

1.1: Go to https://my.vmware.com/web/vmware/info/slug/infrastructure_operations_management/vmware_vcenter_converter_standalone/5_5 and download the installation file.

Step 2: Isolate an ESXi host to use as the destination of the conversion

2.1: Put the ESXi host in maintenance mode. Then right-click and Disconnect from vCenter. It will appear in italics and with a red X through it.

vCenter P2V step 1

2.2: Log on directly to the ESXi host using the root account

vCenter Server P2V Step 2 Read More