
Oh SnapProtect, how you taunt me! It’s one of those products that’s been OEM’d from another vendor so it’s missing some functionality and also means that the documentation specific to it can be sparse. Commvault documentation most likely will be sufficient but ideally there would be documentation would exist on how to perform Service Pack upgrades specifically for SnapProtect. I have a few issues with SnapProtect but I’ll leave that rant for another time. When it came to recently upgrade SnapProtect I had the issue of not finding documentation that would clarify the process so I thought I’d capture it so I can at least return to it in the future if I need to. Below are a list of steps carried out to perform the upgrade. I understand that the media agent upgrade may be flawed, and in my case I couldn’t get it to work correctly, so if someone knows what I’ve done wrong please feel free to leave a comment. I’m not an expert in either SnapProtect or its cousin Commvault. For the vast majority of SnapProtect admins this document may be superfluous but hopefully someone finds it useful.
Pre-Upgrade Task
1. Open a preemptive support case with Netapp
2. Download the software from NetApp support site, copy the installation file to the local drive on the server. The software can be access here with a NetApp login – mysupport.netapp.com/NOW/cgi-bin/license.cgi/download/software/snapprotect/10.0SP11/download.shtml
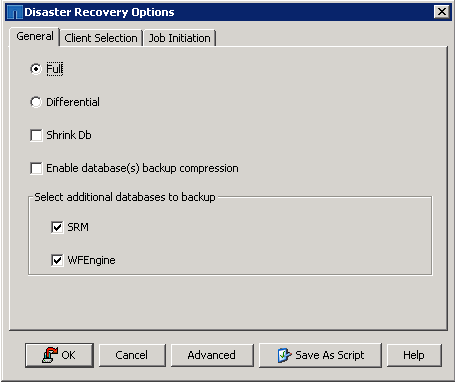
3. Open the SnapProtect Administrative console on the CommServe/SnapProtect Server. In the console right-click on the commserve, select All Tasks and take a backup of SnapProtect using Disaster Recovery backup.

Select the option as a Full backup and click Ok
4. Find the SET_XXX folder, in this case in the SnapProtectDR folder and zip it.
![]() 5. Upload it to the case opened previously with NetApp. You can upload it using upload.netapp.com and validating the case number. You may need to install the Aspera client.
5. Upload it to the case opened previously with NetApp. You can upload it using upload.netapp.com and validating the case number. You may need to install the Aspera client.

6. On the DFM server (should be a different server) take a backup of the DFM database. Use the command dfm backup create pre-upgrade-backup.

Wait for job to complete and ensure the file is available in the backup location
![]()
7. If any jobs are running in DFM use the command: dfpm job abort <jobID>

8. Take a VMware snapshot of all the servers related to the backup procedure. This just gives you a failback should anything go wrong and it really something that should be done for any type of upgrade


9. Go to SnapProtect console and select Schedule Policies. Disable all jobs. This ensures that no jobs run unexpectedly until after the upgrade completes.

Service Pack Upgrade
Before beginning the upgrade reboot the SnapProtect server to ensure that all sessions are closed and to also free up available memory. This will also mean that any Windows patches that need to be installed can be done before the SnapProtect upgrade. SnapProtect can upgrade non-disruptively but as a precaution it’s best to reboot the server first and give yourself a clean platform.
All console sessions to SnapProtect need to be closed before beginning the upgrade. Log back into the server. Next go to where you copied the installation file and extract the zip file. It will extract to Version_10_WinX64_SP11

Ensure the snapshots have been captured correctly within vCenter from the pre-upgrade steps. The upgrade process takes approx 30mins.
1. Double-click the SetUpAll.exe file

2. Click Next for language

3. Click on Install SnapProtect Service Pack

4. The update installer begins. It runs through and stops all the related services. The updates will then be installed.


5. Select Start Services

6. Click Finish to complete the upgrade

7. Open SnapProtect Administrative console

You can quickly see the version number down at the bottom of the console, or go to Support -> About.


Now you will need to upgrade the media agents on the servers
Media Agent Upgrade
1. Go to Client Computer Groups
2. Select Media Agents
3. Expand the media agent you want to update.
4. Right-click on the media agent, select Properties. In the version tab you can see the version number and also which packages and version you are running. The SnapProtect server will already have the updated media agent so select another server and you’ll see the difference in version numbers

5. Select an out of date media agent and right-click -> All Tasks -> Add/Remove Software -> Install Software
6. Click Next, enter domain credentials, click Next. Leave the install packages as default and click Next, click Next, leave the defaults and click Next, leave the defaults and click Next, leave the defaults and click Next, select Run Immediately and click Next, click Finish


7. If that doesn’t work you’ll need to go to each media agent individually and run the software installation. It will pick up the required updates and install only those updates
8. Follow the procedure used to update the software on the main CommServe
Post Upgrade Tasks
Next you will need to re-enable all of the scheduled backup jobs. Following that run a backup job to ensure that you can get a successful backup. This can be done by selecting a subclient and selecting Backup. Confirm the backup runs successfully. Once it does you can also remove/delete the VMware Snapshots taken earlier
The last thing to check is that the new service pack software has been copied to the software cache. The updated files from the extracted software folder were copied to the Updates in Software Cache on the local machine. This was located in the SnapProtect installation folder -> SoftwareCache/CVUpdates/10.0.0/WinX64/ServicePacks. Your location may be different, alter this as required.

Next you will need to edit the Add/Remove Software configuration so you can edit the cache. Right-click on the Commserve -> All Tasks -> Add/Remove Software -> Add/Remove Software Configuration.

Click on Commit Cache once the files have copied over.

Give it about 5 minutes and check the Version of the media agents and you’ll now see that the status is showing as up to date.
