Which Cloud – so many options!

Cloud Computing, or ‘The Cloud’, has become ubiquitous over the past couple of years. A term that was coined and took off within the IT community has taken hold among the general populace and even your granny will be on about storing information in the cloud. But which cloud is the right one? There’s so many different definitions of ‘The Cloud’ that I’d be writing for the next week just to go through them alone. For me, the keys to cloud involve scalability, shared-resources, automation, software/profile driven and provide a self-service function.

For the majority of end-users ‘The Cloud’ is where you store extra backups of your photos or documents on your laptop/smartphone which allows you to both recover those items if needed or access them quickly and easily on another device. Creating a seamless user experience between devices is key for these types of solutions. However for IT professionals it’s not only about these two features.

Cloud technology provides organisations the opportunity to expand their infrastructure and platforms quickly and dynamically while moving the cost model from CAPEX to OPEX. A situation that management are happy to see occur. The use-cases for using cloud technology are numerous but generally center around backup, disaster recovery, test and development, scalable applications and more recently virtual desktop infrastructure (VDI). The options for cloud have been defined as Public, Private and Hybrid. Public Cloud has hit the market hard during the past 3 to 4 years and has the backing of IT heavyweights like Microsoft (Azure), IBM (Softlayer), Google (Google Cloud Platform) and a relative newcomer but absolute beast Amazon (Amazon Web Services). For web-based applications or even start-up companies public cloud is a great way to go as it’s easy to scale and the infrastructure was designed more specifically for modular applications. The shining example of growth, AWS, has a success story with Netflix. Netflix grew rapidly and if it was running on a traditional platform it’s growth would definitely have been limited. However, thanks to using the public cloud to stream their content to the end users it was possible to satisfy the demand for Netflix and now Netflix is responsible to 80% of Sunday night internet traffic in the United States, all running from AWS and managed by a minimal support staff.

The majority of companies will have their own Private cloud or will at least be moving in that direction by having a fully virtualised platform. However, virtualisation is not the same as Cloud. A lot a people make that mistake. Virtualisation provides the mechanisms to allow cloud technology to exist. It leverages the physical resources into a shared virtual resource pool that allows greater utilisation of compute, storage and network resources. Where most Private Clouds fall down is in the area of automation and self-service provisioning. There are a large number of infrastructure providers that fit into the Private Cloud space. Cisco & Netapp teamed up to create Flexpod which has been an extremely popular and has helped Cisco become the leading blade infrastructure provider globally in just 5 years. Cisco UCS’s policy driven platform has helped organisations quickly and easily scale their infrastructure using templates. This has been seen to be the ‘legacy infrastructure’, a term I don’t necessarily agree with because to me it’s a nice marketing term. In just the past 2 years there’s been a huge shift in the storage market that has impacted how storage is now delivered. Hyper-converged infrastructure has been growing rapidly with Nutanix leading the charge. Other similar systems such as the recently announced VMware EVO:RAIL and even Simplivity, which has teamed up with Cisco earlier this year, are creating waves in how infrastructure is delivered. They all bring storage closer to the compute layer and modularise RAM, CPU, Networking and Storage into one unit so that growth is easily scalable at a low-cost entry point. The hyper-converged platforms are definitely going to change how Private Cloud is deployed and managed in the coming years. And the upside to these new players on the market is that some of the older, larger players in the IT market have had a virtual kick in the arse. So expect lots more innovation in the future.

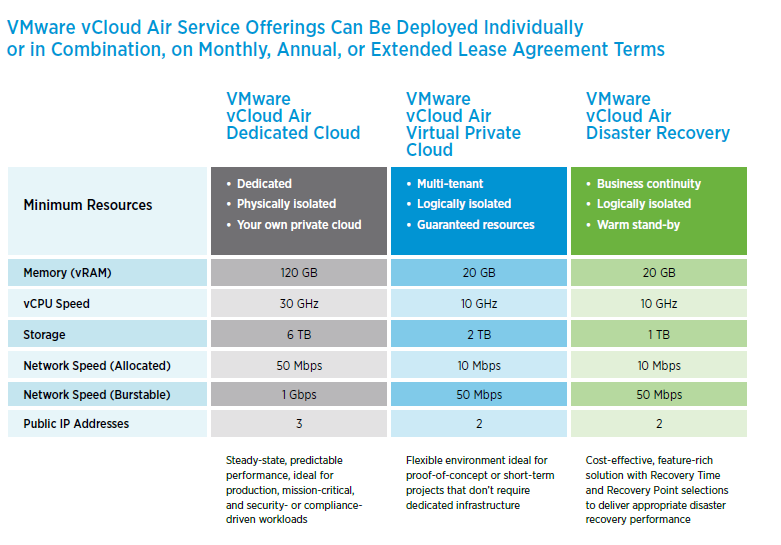
Hybrid cloud has been on a similar trajectory to hyper-converged platforms in the past 2 years or so, on the up and up in terms of popularity. There are many reasons for organisations to utilise the capacity, scalability and resources of public cloud platforms but usually security reasons, internal politics, infrastructure complexities or even application restrictions mean that it’s not possible to move the entire production infrastructure. However, having the opportunity to open up your environment to leverage some public resources in a private capacity and under the control and security of just one IT team. As an engineer at a company that suffers from tombstone applications (applications that have been left in the environment with no owners and no responsible person but cannot be moved or upgraded) and valid security concerns around sensitive data the only option regarding cloud technology is Hybrid. I’m currently looking into our options around this and some very recent announcements have really tweaked my interest. I plan to go into more detail around some of these over the coming weeks but some worth a look at VMware’s new vCloud Air announcement and also NetApp Cloud OnTap and Private Storage.

So if you’ve read this far you have to right to ask if I’ve told you which Cloud you should choose. I haven’t. I can’t tell you that. There’s just far too many options. Nowadays IT, and in particular Cloud, is the equivalent of a menu at the Cheesecake Factory, absolutely immense and when the waiter asks what you want you blindly point at the menu hoping that you get something you wouldn’t mind eating as you couldn’t get past reading the second page. Cloud is just the same. So many options, not enough time. You really have to analyse your environment, your requirements and your desired roadmap so that you can match the type of cloud you need.


post

vForum – Melbourne

Earlier this week I attended the VMware vForum roadshow as it came to Melbourne for the first time. As part of the 10 year anniversary of vForum in Australia VMware have decided to bring the show on the road and do a whistle stop tour in each of the state capitals. This is a great idea. Even if it’s only a one day event and not the two-day event that normally takes place in Sydney it’s still good to have easy access to the event. The last vForum I went to was 2 years ago working with a vendor so it’s a different experience being on the opposite side and also getting the time to take in as many of the sessions as I could. Maybe it’s more experience and better knowledge on my part but I felt that I got far more out of the sessions at this vForum that any other conference/roadshow I’ve attend.

The biggest announcements were tied to VMware’s bid for a Hybrid Cloud and device mobility with a focus on Airwatch by VMware.  Last week at vForum Sydney VMware announced that they were partnering with Telstra to deliver the first vCloud Air environment in Australia early next year. This week it was confirmed by Telstra that the datacenter is located in Clayton in Melbourne and that vCloud Air is scheduled for the first quarter of 2015. I attended a session by Telstra and it was interesting that they announced VBlock as their platform for vCloud Air. I know Telstra has a mixed environment and it’s not immensely surprised that VMware’s sister company EMC would the storage vendor of choice. Telstra also announced that their NextIP customers would not incur any extra costs for moving data in and out of the vCloud Air service. A bonus really for those clients. I’ll come to the configuration specifications of vCloud Air in a moment. As with all of these events there are some dud sessions but some that really open your eyes. Likewise with vendors. I had some really insightful chats with the guys from Veeam, PernixData and AirWatch. These 3 vendors are adding something new to data center or mobile technologies and are the ones that link into what I’m working on at the moment. The main take-aways for each of these were:

Airwatch
  • Corporate App Store
  • Control app and desktop access via policies
  • Don’t think of it from a technology perspective but from a use case perspective – this was constantly reiterated by Rob Roe of Airwatch
  • Allows single sign-on with SAMIL so that when you launch the app it logs in automatically
Pernix Data
  • Creates a flash cluster from locally installed cache to take the workload off of the storage
  • It uses flash for read write and provides flash resilience as data is copied between flash and later flushed to persistent storage
  • Great for exchange, SQL and oracle
  • Zettagrid have implemented it for their environment for exchange and have seen immense improvement.
  • VMware are also working with SanDisk on a something similar to this solution. Pernix Data’s argument is that they  are more evolved so will still be relevant

Veeam

  • Netapp snapshots run 18x times faster than commvault for full and 12x faster for incremental. No need to do full scans of volumes before hand like commvault does.
  • Agentless always awesome
  • Doesn’t have to present the snap back up to the hypervisor. Veeam manages it’s snapshots through CBT
  • Has new cloud connect platform to backup over wan to cloud. Within cloud you can deploy veeam and quickly and easily restore back.
  • Now has a free endpoint backup software for laptop backups to either local or remote backup. Swaps restores back to the end user. Currently free but is still fully supported with Veeam. Can also be used on physical servers. There is no central management console right now but most likely will be in the next year. Veeam have a history of making free editions of apps to bring in new customers

Before I get into vCloud Air one of the other sessions I went to was around the vRealize Suite which helped to clarify what they are trying to do in this space and what some of the new features are. VMware has essentially packaged all their peripheral software into on bundle which now provides massive value-add to the end user. You now have the choice to use VMware for the infrastructure, cloud, monitoring, BI, automation and virtual networking. They are going for the whole show. Some of the new features of Operations Manager (formerly vSOM) are:

  • Now can be clustered and scale on ops manager
  • No more appliance, just one box
  • Ops mgr will be released at the end of the year
  • Can now handle 64000 objects compared to the current 6000
  • Log insight is the splunk of VMware, not charged on a log data amount but on instance numbers
  • They took out the numbers in the status badges as it was too confusing.

vcloudAir options

So vCloud Air. vCloud Air will utilise VMware vCloud Director to create multi-tenant environments with isolated resources. This will make it easier, and is VMware’s argument, to migrate to vCloud Air without having to change any configuration of the VM or the application, there’s no performance change on VMs when transferred to cloud. There’s also no need for the admins to learn new tools as vCloud Air is just an extension of their current VMWare environment. vCloud Air will run on ESXi just as your own production systems do. This is also where VMware differs from the other cloud providers. If you’re not running VMware then chances are you not going to be looking at vCloud Air as an option. As mentioned already it will be hosted by Telstra and it can be a dedicated cloud or virtual private cloud. There are also options to use just the Disaster Recovery option or just Desktop as a Service from vCloud Air. It runs on logically separated storage for the virtual private cloud. Everything is shared. If dedicated storage required a cross connect from Telstra colo required. vCloud Air will have 11 sites globally and will have HA built in. The migration options to vCloud Air are using OVF imports one at a time or offline transfer or to use vCloud connector to move VM or template one at a time, over https uploads via APIs.

You can get more information on vCloud Air from here:

www.vmware.com/go/vcloudair 

http://vCloud.vmware.com

To me vCloud Air is promising and is a good first step from VMware. I’ve been researching a few other potential Cloud solutions over the past few weeks and it fits into a potential use case for us. There are other possiblities such as just using Amazon or Azure, or even using NetApp Cloud OnTap in Amazon AWS or even other cloud providers such as AT&T, Telstra. And lets not forget Cisco InterCloud Fabric. I’ll try to review some of these in the coming weeks.
vForum to me was a success and I hope that VMware follow a similar formula next year and bring vForum to the masses.

New Challenges and career focus

As with all careers there comes a point when you make a decision about what’s really important to you. This decision involves looking at what’s important to you from a work perspective and also, and I’d argue more importantly, from a home/life perspective. Today we are seeing a shift from the 9 to 5 worker to the always on/work from anywhere worker. While this is great for flexibility, it does mean that your work and home life intermix quite a lot. As a father to a young daughter and another one on the way I have decided to prioritize my family time over my work time. This may change in the future but right now it’s the right decision for me. I have worked as a client-facing consultant for small consultancy firms for the past 3 years and this has involved a large commitment of my personal time into being able to perform the role to the best of my ability and to provide our customers with the service levels they both expect and require. It has been an amazing learning experience to see how different consultancy firms work out their place in the market and how they also deal with the challenges of growing the companies. As an IT person there’s a requirement, and shall I add enjoyment, to keep on top of what’s currently available on the market, who the competitors are and how these products fit it with or compete with your product portfolio or product strategies. This means that IT is part of my life and I love what I do but my family life and time was suffering due to work expectations. And so my decision has been to leave a consultancy role and join the dark-side as a permanent staff member.

I’ve recently started in a new role for a large pharmaceutical company as a Senior Systems Engineer. Within the role my primary focus will be on VMware, Cisco UCS, Netapp MetroCluster and also driving the data center and application/desktop virtualization strategy and roadmaps. I’ve worked with Flexpod for the past 9 months with two very large clients, one of which was using Flexpod as their platform to deliver a public cloud offering wrapped up in a Rackspace style managed service. Flexpod is a complex system. There are a number of other IT systems on the market which are far easier to use and deploy but they don’t provide the same level of knowledge of storage, networking, compute and virtualization. To work with Flexpod you need to understand all components within the Pod and this leads to a better understanding of technology as a whole. In my new role I’ll be working with UCS Director for automation to improve the efficiency of the infrastructure deployment and also focus on chargeback components to help convert the IT department into a cost center that can make departments responsible for their own IT spend.

My new role is a step up from my previous position and I’m looking forward to the challenge and responsibility. As with all new roles it takes a bit of time to find your feet and make your mark. I’m looking forward to getting to grips with all the systems that need to be supported and figuring out how to improve processes and technology to drive innovation within the IT department. All while enjoying time with my family and getting to see my daughter and soon to exist child grow and develop. I’m excited about the possibilities over the coming years and my role within those.

For anyone that has been on this blog in the past you will know that I’m not the most prolific blogger. Over the next while I do intend to keep the blog up to date a bit more and try to develop at least one decent blog post a month. At the moment I don’t have a strategy in place for what I want this blog to be other than a placeholder for some work I’ve carried out, issues I’ve faced and managed to resolve, or just general chat about technology that is coming out. Maybe down the road it will become a bit more specific. Hopefully with a bit of extra time that I now have I can blog a bit more 🙂

post

Trend Deep Security Manager 9 – Post Installation Issue

DSVA Security Update Failed:

Once I had the full Trend Deep Security Manager environment installed I ran the Download Security Updates command to get the latest updates from the Trend website. When trying to update the DSVA I got the following error:
Error Code: -1073676286 Error Message: IAU_STATUS_NETWORK_CONNECTION_FAILURE https://trendserver1:4122/ 
I ran a putty session on the ESX host server (where DSVA security update fails) and saw that there is an entry under vmkernel.log that shows “DSVA not bound”. When I logged into vShield Manager and checked the ESX Host summary and saw that vShield Endpoint was installed but that there were no items listed in Service Virtual Machines. This should show the name of the protected DSVA on that host.
The issue occurs when the DSVA and filter driver improperly bind, causing communication failure between DSVA and the VM to protect. To successfully activate the VM:
  1. Ensure that the value 169.254.1.1 is bound to Dvfilter-dsa.
    1. On the vCenter, click the ESXi host.
    2. Go to Configuration tab > Advanced Settings > Net.
    3. Make sure that the value of Net.DVFilterBindIPAddress is “169.254.1.1”.
  2. Make sure that the dvfilter is listening to port 2222.
    1. On the vCenter, click the ESXi host.
    2. Go to Configuration tab > Security Profile.
    3. Under Firewall, click Properties.
    4. Ensure that the dvfilter is selected and listening to port 2222.
  3. Restart the filter driver.
    1. Put the ESXi on maintenance mode. This requires turning off the VMs or migrating them to another ESXi host.
    2. Connect to the ESXi host via SSH using Putty.
    3. Run the command “esxcfg-module -u dvfilter-dsa” to unload the filter driver.
    4. Run the command “esxcfg-module dvfilter-dsa” to reload the filter driver.
    5. Exit the ESXi from maintenance mode.
  4. Power on the DSVA.
  5. On the Deep Security Manager (DSM) console, make sure that the DSVA status is “Managed-Online” and the vShield Endpoint status is “Registered”.
  6. Activate the VM.
Activation will be successful and the “Dvfilter-dsa: update_sp_binding: DSVA not bound” will no longer appear on the ESXi log.
Deactivating and re-activating the DSVAs fixed this issue.


post

Trend Deep Security Manager 9 – Install and Configure (again!)

While working on a recent project for a client utilising Cisco UCS and NetApp for a cloud offering I was tasked with getting Trend Deep Security 9 working for a multi-tenant cloud environment. The primary caveat is that the environment isn’t true end-to-end multi-tenancy as the virtualisation layer is not fully segregated. vCloud Director or another similar tool has not been used but rather the vCloud Suite from VMware and segregation is at the network and storage layers through the use of vDCs on Nexus 7k (network) and SVMs on NetApp Clustered Data OnTap (storage virtual machines). In the production environment Trend Micro professional services were engaged to deliver the original design. Part of the criteria given to them was not to enable multi-tenant mode within the Shared Resources cluster as the tenants would not be managing their own anti-virus protection or scanning. In order to satisfy the requirements of multiple VMware clusters protected by one Anti-virus package a DSM was deployed on each cluster and managed from a central console within the Management cluster. I will go into more of a discussion on the ideal architectural design for multi-tenant anti-virus in another posting.

And so to the beginning of the troubles. No anti-virus solution is really ever straight-forward. There’s a number of policies and exclusions to consider for both operating systems and specific applications and usually there is lack of distinct information within the installation and admin guides. Trend Micro Deep Security Manager is no different. This however is not a huge criticism of Trend, they have to make their documentation as generic as possible for multiple use cases. It does make installation just that bit more frustrating though. You can find the full Deep Security 9.0 Installation Guide here.

Trend Micro Deep Security consists of a number of components that work together to provide protection against viruses and malware in real-time. It can also provide Intrusion Prevention, Web Reputation, Firewalling, File Integrity Monitoring and Log Inspection. It is also available as both agent-based and agentless options. The component of Trend Deep Security are:

  • Deep Security Management Console (DSM) – this server (recommended to be virtualised) is the central web-based management console for controlling and managing all Deep Security enforcement components (DSA’s and DSVA’s). The Server is recommended to be Windows Server 2008/2012 R2 64bit.. It is important that it is installed on a different ESXi host to that hosting the VM’s which are protected by the DSM. The DSM should be allocated 8GB and have 4 vCPU allocated. This configuration will be capable of serving up to 10000 agents. The MS SQL database size is relatively small at around 20GB for 10,000 agents.
  • Deep Security Relay (DSR) – this server is responsible for contacting Trend Micro’s Security Centre for collection of platform and security updates and relaying this consolidated information back to the DSM and to Agents and Virtual Appliances. The DSR will also be virtualised at Interactive with 8GB ram and 4 vCPU. This configuration will be capable of serving up to 10,000 agents. The Relay has an embedded Agent to provide local protection on the host machine. In the case of multiple relays each will act independently and synchronise their local databases with the Trend Security Centre.
  • Deep Security Virtual Appliance (DSVA) – this server is a virtual machine appliance that is installed on every ESXi host. The DSVA enables agentless Deep Security control and management within the hypervisor, providing Anti-Malware, Intrusion Prevention, Integrity Monitoring, Firewall, Web Application Protection and Application Control protection to each VM. The agentless control is only currently available for vSphere 5.1 or earlier. Support for VMware 5.5 will be available in 2014 Q2. The DSVA will communicate directly with the DSM and it is recommended to enable affinity rules within VMware to lock each DSVA to their required ESXi host.
  • Deep Security Agent – for non-Windows servers (such as Linux), the agent is deployed directly to the VM’s OS computer, providing Intrusion Prevention, Firewall, Web Application Protection, Application Control, Integrity Monitoring and Log Inspection protection. This is the traditional client-server deployment model and the agent could be included within the imaging process or pushed out from the DSM. DSA will also be necessary on all VM’s within a vSphere 5.5 hypervisor until Q2 2014 (after which a DSVA can be used with vSphere 5.5).
  • Smart Protection Server. Web reputation works by clients contacting Trend Micro’s Smart Protection Service on the Internet. Rather than all clients accessing this service, it is possible to deploy Trend Micro’s Smart Protection Server as a VM. The Smart Protection Server will periodically update its URL list allowing it to locally respond to client requests for web reputation ratings. This component is normally part of the Trend Micro Office Scan products and using it may incur an additional licensing fee. Given that the DSVA also caches similar data, this product is not recommended. Hence, the DSVA and DSA will regularly be checking web reputation over the Internet.
  • Deep Security Notifier – is aWindows System Tray application that communicates the state of the Deep Security Agent and Deep Security Relay on local computers. A DSA and DSR already contain the Notifier but for Windows guests protected by the DSVA will need ti install the Notifier as a standalone application.

Read More

vShield Manager – Unable to view installation status of Endpoint

I’ve recently been getting my hands dirty with vShield Manager 5.2. The biggest problem I’ve found with vShield Manager is the wholesale lack of documentation on how the product works and how best to configure it for multiple different environment types. There is general installation and configuration documentation but usually once you go outside of the scope of these there’s a distinct lack of information and it takes a degree in Google Search Dynamics to help find an answer to a problem.

Despite my bitching I did manage to find a solution to a problem for vShield Manager the other day. I’ve been working on bringing a test Flexpod environment up to date. As with a lot of test environments the applications were deployed but never configured. vShield Manager was no different in this case. The error I saw within vShield Manager when I checked the Summary on the ESXi host was: Not applicable to ESX version below 4.1 Patch 3. My immediate question is how can this be possible, I’m running version 5.1 Express Patch 5 and the environment has never had version 4 installed? It turns out this issue is due to the web interface and the steps to resolve the issue can be found here.

My remediation steps for the issue involved:
  • Checking the permissions on AD for the service account. It was using the administrator account.
  • Created a service account called svc-vsm-<vmname> and gave it domain admin access.
  • I then delegated permissions from vCenter datacenter for it.
Once the above was completed I did the following:
  1. Logged in to the vShield Manager virtual machine using your admin credentials:
    username: admin
    default password: default
  2. To enable root privilege, I ran this command:
    enable <enter>
  3. Entered the admin password again.
  4. Ran this command to configure the terminal:
    config t <enter> (config <space> t)
  5. Ran this command to disable the Web services:
    no web-manager <enter>
  6. Waited for a second or two and then enabled the Web service using this command:
    web-manager <enter>
  7. Ran this command twice to exit the system:
    exit <enter> and then exit <enter> again to log out fully.
  8. Reloaded the client to see the changes and hey presto vShield Endpoint showed up as installed for that ESXi host

Home Lab – Let’s play ball!

I recently made the decision to finally get a lab. It’s something I’ve been meaning to do for a long time but either not had the time or finances to do it. After much deliberation and talking to others who also have a home lab already in place the decision was made to go with a HP Gen8 Microserver. The lab all up for a fully kitted out Microserver cost $1400. This included having to buy peripherals such as monitor, keyboard and mouse. As I moved house in the past few months I also managed to clear out any old kit I had lying around which meant having to purchase some new devices. I also purchased a new 8-port 1GB switch to connect the environment and allow me to scale if required.

The switch will connect to my internet facing router and using port forwarding I will be able to access the environment remotely. Noip.com will be used to dynamically update my external facing IP address to deal with those pesky power outages. This will also provide a DNS name I can access externally for web interface based projects. All for the princely sum of $0. I have decided to put VMware vSphere 5.1 on the host with the plan to upgrade to vSphere 5.5. When I begin these steps I will provide a documented update here on the blog. The vSphere 5.5 installation will be based on the last available beta release from VMware. The first project I want to work on is a Citrix XenDesktop deployment using Global Server Load Balancing on Netscaler VPX. So far I have only configured the switch as a pass-through device and the Microserver has vSphere 5.1 installed. The next steps are to get a cable long enough to travel from the switch to the router, configure port forwarding on the route to a DMZ based VM which will allow pass-through to the virtual environment.

Describing how the lab is built in these blog posts will also mean that if I get a disk failure then I’ll be able to rebuild based on the design plans 🙂

The HP Gen8 Microserver also functions as a NAS device. The spec is as follows:

Processor: Intel Celeron G1610T (2 core, 2.3 GHz, 2MB, 35W)

Number of processors: 1

Processor core available: 2

Power supply type: (1) 150W non-hot plug, non redundant power supply kit Multi-output

Expansion slots: (1) PCIe, for detail descriptions reference the QuickSpec

Memory, standard: 2GB (1x2GB) UDIMM (Upgraded to 16GB – 2x8Gb UDIMMs)

Memory slots: 2 DIMM slots

Memory type: 1R x 8 PC3-12800E-11 (ECC RAM required)

Included Hard drives: None ship standard, support up to (4) LFF SATA non-hot plug drives (Intalled 4x3TB Seagate 3.5″ HDDs)

Optical drive type: None ship standard

Network Controller: 1Gb 332i Ethernet Adapter 2 Ports per controller

Storage Controller: (1) Dynamic Smart Array B120i/ZM


Networking:

HP PS1810-8G 8-Port Gigabite Switch

post

Veeam Backup & Replication version 7

Veeam have been playing a bit of a teasing game with its customers over the past few months. It’s been an exciting game as month by month new features have been unveiled, whetting the appetite of Veeam fans everywhere as they eagerly awaited the next slice of awesomeness to be revealed. Each feature added to Veeams already extensive feature set. I will say up front that I’m biased here as I use Veeam quite a lot and have seen it mature from being the only option for SMBs to tickling the feet of Enterprise companies. As the months went by the features became more impressive, from integration directly to vSphere Web Client, to SureBackup for Hyper-V, to SureReplica in VMware to Native Tape Backup Support. Yes you read that correctly, Veeam now supports backup to tape. No more need for agents to backup to tape or having another backup product to archive your data to tape for off-site storage. This will all be taken care of within one console.

But even these features don’t match the two announcements back on the 16th May. Veeam has integrated with HP storage (LeftHand, 3Par, StoreVirtual VSA) to allow backup from Storage Snapshots, which greatly reduces the backup time, and a built-in WAN-Accelerator to increase the speed of off-site backups by up to 50%. These two features, with the WAN-Accelerator in particular, have pushed Veeam into the realm of truly viable Enterprise Backup Solutions.

So, I’ll give a run down of the features as they were released by Veeam.

  1. Enhanced Backup & Recovery for vCloud Director
  2. Plug-in for vSphere Web Client
  3. Veeam Explorer for MS Sharepoint
  4. Virtual Lab for Hyper-V
  5. Native Tape Support
  6. Enhanced 1-click Restore
  7. Virtual Lab for Replicas


Enhanced Backup & Recovery for vCloud Director

This feature extends Veeam Backup & Replication to allow Veeam to grow as it’s clients grow. As more and more focus is put on Private and Hybrid Clouds and enabling self-service IT we are seeing more clients begin to utilize vCloud Director. The enhancements allow Veeam to use the vCloud Director API to display the vCloud Director infrastructure directly in Backup & Replication. This allows the backup of vApps metadata and attributes, restore vApps and VMs directly to vCloud Director and support restore of fast-provisioned VMs

Plug-in for vSphere Web Client

The web client for vSphere released in 5.1 is being pushed heavily by VMware and it will gain more traction over time. The upside is that is allows for plug-ins from 3rd party apps. And Veeam have taken full advantage of that. The web client allows VMware and Veeam admins, usually one and the same person, to easily manager both their virtual infrastructure and virtual backups all from one console. There is no need to have to log into the Veeam console as well as your vSphere client separately. It’s all now in one easy to use console.  This is a feature that was requested from Veeam clients, and while the web client popularity has not gained too many followers, when it does Veeam will already be ahead of the game. Once again, as with all things Veeam, it’s easy to configure.

Veeam Webclient

Veeam Explorer for MS Sharepoint

This is probably the one feature that I’ve been least interested in. Partly this is due to the fact that Veeam could already recover Sharepoint objects with relative ease. They have leveraged the highly successful Veeam Explorer for MS Exchange that quickly cracks open backup files to allow users to browse for emails and made a similar explorer for Sharepoint to quickly and easily allow the recovery of Sharepoint files. The ability for Veeam to open a compressed, deduplicated backup file through an explorer window is extremely impressive to watch. There is one drawback, it can’t do full site recovery. That I can assume will be in version 7.x or 8.

Virtual Lab for Hyper-V

Virtual Lab, or SureBackup as it’s also known, has been a solid feature of Veeam running on VMware for a few version now and it’s great to see that expand to Hyper-V. I’m not going to go into SureBackup and Virtual Labs too much, they’re a massively great topic on their own, but the fact that both VMware and Hyper-V can leverage the sandboxed VM restore feature of Veeam just goes to show how Hyper-V is maturing and deserves some attention from 3rd party software vendors. Veeam recently received a patent for its vPowerNFS software intelligence and has utilized that within Hyper-V to allow testing of VMs and also testing the validity and consistency of Veeam backups in a sandboxed environment, all running from backup storage. Genius!

Virtual Labs thumbnail

Native Tape Support

I should not have been as excited as I was when I heard that native tape support was a new feature of Veeam version 7. It may not seem like such an advanced feature to most people that currently backup to tape but it’s been a bit of an Achilles heel for Veeam for a long time now. It’s always been an issue for customers that still trust tape for long term archiving to be able to easily backup their VMs in Veeam but then have to use another product to backup to tape. This normally involved having to pay more license fees for another product and any agents that were required. This massive pain point has finally been dealt with. Archive to tape in Veeam supports virtual tape libraries (VTLs), tape libraries and standalone drives. Basically, if the OS can detect the drive then Veeam can write to/from the device. The other great feature is that you can restore directly from tape back into Veeam without having to stage the data first.

Enhanced 1-click Restore

If I’m honest I didn’t necessarily see the value of this straight away. I quickly overlooked it as a new feature but on second viewing it’s an awesome little feature. 1-click restore uses the Enterprise Manager console, run on IIS, to allow end users to be able to restore files on a self-service basis, which is one of the tenets of the Private Cloud model. I think this will become a really useful feature for customers that really want to go toward the fully self-service IT model.

  • An easy interface for finding and quickly recovering individual VMs and guest files
  • Delegation settings that control exactly which VMs and guest files users can recover
  • The security of knowing you have the ability to authorize user access to only the items that are appropriate

Enhanced 1 click file restore


Virtual Lab for Replicas

Virtual Labs has been around for a while now and is a staple for most Veeam deployments as it can automate the verification process on your backs so you can sleep peacefully in the knowledge that everything is consistent and that in the event of a failure you have backups which have been tested and are known to work. This has only been available for backups in the past. Now that Veeam is moving more toward a full DR solution as well it is necessary to provide a method to automatically test the consistency of replica VMs. This feature is only available currently with VMware but not doubt over time it will be made available to Hyper-V. This is something I’m definitely looking forward to getting my hands on as I already have clients request it.

Backups from Storage Snapshots:

Veeam has integrated with some variants of HP storage to allow Backup from Storage Snapshots which greatly reduces the overheads required to capture a snapshot by offloading all the heavy lifting to the storage array. This offload makes the snapshot capture up to 20x times faster than normal snapshotting technology and reduces the overhead on your production VMs by reducing the VM I/O requirement for creating a snapshot and minimize the impact on the VM and the host. This sort of feature has been available on enterprise-class backup solutions for a few years now but Veeam has added it to it’s arsenal for currently only HP based storage. They are working with other vendors so we can expect to see this expand over time. This new feature links in nicely with Veeam Explorer for SAN Snapshots released last year which allows you to crack open a SAN snapshot to easily recover data.

Built-in WAN Acceleration:

The WAN acceleration is a proprietary Veeam feature that was designed to push Veeam backup files to the cloud or to a hosted DR site. It works as a source-side deduplication device that ensures that any blocks that have been sent across the link already do not need to be sent over the wire again during backup. Veeam estimate that this will improve the performance of off-site data copy by up to 50x. This remains to be tested in the wild and it will be really interesting to see what sort of performance can be achieved with the WAN accelerator, but any way to increase the off-site data transfer speeds is a winner in my book. Even a 5x increase would be great.

wan accelerator

All you need to get WAN acceleration in place is an accelerator configured on each side of the WAN link and away you go. Increased data transfer speeds in the usual Veeam keep-it-simple way.

So they are all the new Veeam version 7 features. It’s an absolute raft of features for a product that was already ahead of its competitors. This such as the Backup from Storage Snapshots, WAN acceleration, Virtual Lab for Replicas and Native Tape Support really lift Veeam to a new level and it will be really interesting to see how this new version works in the wild. I’m looking forward to getting my hands dirty with it

post

Veeam Cloud Backup Edition

Veeam have released a new Cloud Backup & Replication edition recently that allows companies to upload their backups from local site to any of 19 different Cloud providers. As with all Veeam products the Cloud Edition is easy to use, powerful and affordable. It provides clients that have disk backups the opportunity to push the backup files to the cloud for long term storage. The configuration and set up is simple and quick and you can really begin to upload your backup files to AWS, Azure or Rackspace within 30 minutes. Easy! As this is the first iteration for Cloud Edition there are however some drawbacks to be aware of.

select cloud storage account

The primary setback is getting your data back out of the Cloud. Getting the data in is so easy it’s almost crazy. Getting access to your data in the Cloud however involves a few workarounds. We’ll take AWS as the example here. You cannot export files back out of AWS in any format other that OVF.  To be able to get access to your Veeam Backup data once it’s in the Cloud, essentially doing a restore in the Cloud, requires performing some steps to make it work. This is a long enough process at the moment and I can definitely see this being refined by Veeam over time. The first step you need to take is to deploy an EC2 instance in AWS and within that instance deploy Veeam Backup & Replication Cloud Edition. You will also need an OVF conversion tool and some AWS tools, the ECC & ELB toolsets.

So the steps needed to upload are:

  • Create an EC2 instance in AWS running a Windows O/S
  • Install Veeam Backup and Replication
  • Create a S3 Bucket in AWS
  • Link your S3 Bucket in AWS to you local copy of Veeam Backup & Replication Cloud Edition
  • Upload your backup files from your local site to the AWS S3 Bucket

Steps needed to retrieve your backup files from AWS are:

  • Log onto your EC2 instance running Veeam Backup & Replication Cloud Edition
  • Add your repository from the S3 Bucket
  • Veeam Cloud will recognise there is a backup from another Veeam Backup and Replication Cloud Edition
  • Select Recover Another Computer
  • Synchronize the Repository tools
  • Import the VBK files to Veeam Backup & Replication from the repository
  • Restore your vbk files in their native VMDK format to a location on your EC2 instance, add a disk if necessary
  • restore vodka in veer
  • Convert your vmx file to ovf format – c:tempovftool <path>my_vm.vmx <path>my_vapp.ovf

Next you need to import OVF files to an EC2 instance in the cloud.

Import using the following command –

ec2-import-instance DISK_IMAGE_FILENAME -t INSTANCETYPE -f FORMAT -a ARCHITECTURE-SYSTEM -b S3_BUCKET_NAME -o OWNER -w SECRETKEY

An example of this is:

C:aws>ec2-import-instance c:tempovfCloud_SRV02-disk1.vmdk -f VMDK -t t1.micro -a x86_64 -b veeamcloud -o AKIAJV4UGHUBMTYWUU5Q -w oVjR52YPAHRxxxxxxxxxxxxxxxxxxx3BcEwh5p –region ap-southeast-2

Legend:

-t                     Amazon Instance Types can be found here: http://aws.amazon.com/ec2/instance-types/

-a                     Amazon Architecture Systems

i386                 Windows 32bit Operating Systems

X86_64            Windows 64bit Operating Systems

–region

Once this has been done you are almost there. You need to check the conversion process:

ec2-decribe-conversion-tasks <tasked> –region <region>

example for the above would be

 ect-describe-conversion-task import-i-fgisoqvn –region ap-southeast-2a

Once the conversion has taken place you will have a new EC2 instance of your virtual machine available

cloud in AWS post conversion

And ta-da! Your Veeam Backup copy of your data is now available as an EC2 instance in the Cloud. As I mentioned already, it’s a bit of a work around but it’s definitely something that will be revised heavily in the next revision of Veeam Cloud Edition.

If you currently use Veeam Backup & Replication you may need to make some changes to get the most advantage out of Cloud Edition. Firstly, you will need to change your licensing model from perpetual license to subscription based licensing. This is the way Veeam will be licensing their products from now on so it’s not surprising that they have already begun to make this move. There will be an initial saving in licensing costs for the end-user so the subscription model is a good move for both Veeam and it’s customers.

Another issue you need to be aware of is the backup type you are using, whether that is forward-incremental or reverse-incremental. Forward-incremental is the best backup method for use with Veeam Cloud. So if you have your backups configured as reverse-incremental you may need to swap the backup method over to forward-incremental. The reason of this is the amount of data being transferred. Forward-incremental will only push your latest data changes up to the public cloud. Reverse-incremental by its very nature is essentially a full backup so each time you push the backup to the public cloud it will push a full backup. Depending on bandwidth and the size of your vbk files this may not be an issue, but for most end-users it could begin to use up unnecessary bandwidth. It is recommended to engage with a Veeam recommended solutions integrator to help with the design of the backups and replication with Cloud Edition.

One of the really nice features included with Veeam Cloud Edition is the integration of a Cloud Cost Calculator. This is something that is really useful for users to work out their general costs in advance without giving Cloud Edition a go first and then getting stumped with a hefty bill from their Cloud provider.

cloud cost estimates

The supported Hypervisor platforms are:

VMware vSphere 3.5 – 5.1

Microsoft HyperV: 2008 R2 & 2012

Licensing model: 

Veeam Cloud Edition is available as an annual subscription. The paid subscription includes the full functionality of Veeam Backup & Replication to backup your virtual environment, as well as new functionality that can copy backups to the cloud.

veeam model comparison

post

Unidesk – Layers: A New Simpler Approach to Managing Desktops

Layers: A Brand New, Simpler Approach to Managing Desktops

unidesk solution overviewUnidesk’s patent-pending desktop layering technology combines the management simplicity and storage efficiency of non-persistent, stateless virtual desktops with the modern, customizable user experience of persistent desktops. Unidesk desktops boot off of a virtual C: drive made up of independently managed, cleanly separated “layers.” IT uses Unidesk to create single pristine layers of the Windows OS and standard applications. As end users use their desktops, their changes are automatically captured in personalization layers. Unidesk dynamically composes these layers at boot time into unified storage. Workers get desktops they can fully customize. IT gets desktops that are easy to provision, patch, and repair.

How Unidesk Desktop Layering Works

Unidesk Composite Virtualization™ technology dynamically combines the OS and app layers created andassigned by IT with each user’s personalization layer. IT can provision, patch, and update all desktops bysimply updating a layer once. None of IT’s changes affect the local profile settings, user-installedapplications, and data in the personalization layer. Because Unidesk operates between the hypervisor andMicrosoft Windows, anything can be a layer, including the OS itself, system services, and kernel-mode apps.

unidesk overviewWhere Unidesk Fits in the VDI “Stack”

Unidesk exceeds the capabilities of profile management, application virtualization, storage optimization,and PC configuration point tools with one, unified solution that minimizes VDI cost and complexity.

unidesk solution overview1

Seamless Integration with Existing Infrastructure

Unidesk software integrates quickly with your existing VMware vSphere infrastructure, connection broker, directory, and storage. Unidesk consists purely of virtual appliances – no additional hardware is required.

unidesk solution overview2

Next Step: Evaluate Unidesk
Evaluate Unidesk in your own environment – technical requirements are simple. All you need are:

  • One VMware ESX™ (VI3™ or vSphere™) host, connected to VMware vCenter Server.
  • 100GB of centralized or local storage. Unidesk’s automated Personalization Layer replication protects all desktops from local host or local storage failures.
  • Microsoft Windows XP or Microsoft Windows 7 as your desktop operating system.
  • Microsoft Remote Desktop Connection (free with Windows) or any connection broker.