
Following on from installing vROPS a few month back I finally made the jump to install the Blue Medora management packs for both Cisco UCS and NetApp to get greater visibility into my virtual environment and the underlying physical infrastructure. I’m really looking forward to seeing what these management packs have to offer. While I’m not going to cover off the dashboards provided by the management packs in this post it is something I plan on revisiting once it’s been in use for a while and I’ve done a bit more playing around with it. The reason I’m posting this deployment process is that despite Blue Medora having decent installation guide it’s not always 100% clear, so I’ve done this to hopefully help guide a few others through the process a bit easier.
Cisco UCS Management Pack Deployment
Before you begin this deployment you can download trial versions from Blue Medora and if you want a permanent installation purchase some licenses from Blue Medora.
1: In vRealize Operations Manager go to the Administration -> Solutions

2: Click Add in Solutions

3: Click Browse and select the Cissco-UCS-Adapter-2.0.pak. Click Upload.

4: Click Next once the file has been uploaded

5: Accept the license and click Next.

6: Click Finish to complete the install

7: Next click on Licensing -> Licenses. Select the Cisco UCS Adapter and click on Configure. Enter the license key purchased from Blue Medora and click Save.

8: Next click on Credentials -> Cisco UCS Adapter and click on Configure. Enter credentials that have access to Cisco UCS and also vROPS. I selected the admin account for vROPS and a domain account for UCS. Click Ok.

9: Next click on Solutions -> Cisco UCS Adapter and click on Configure. Enter a name of the UCS domain you want to add to the adapter.

10: You can add multiple instances to one adapter. Add some details for display name and description, enter the host name for the UCS Fabric Interconnect and apply the UCS credentials created earlier.

11: Make sure to click on Test Connection. Click OK on a successful test. If it fails then check the credentials and protocol settings.

12: Click on Save Settings. If you complete everything, confirm the connection works a close the dialog screen you will lose all the information already input.

13: You’ll now see the Cisco UCS adapters begin collecting data.

14: One of the last things to do is to assign the license to specific objects within VMware. Next click on Licensing -> Licensing Groups. Select the Cisco UCS Adapter and click on Edit. Select the vCenter Operations Management Pack for Cisco UCS and click Next.

15: Add all the Cisco UCS blades by selecting the relevant blades from vSphere Hosts and Clusters and click Add.

16: Verify the blades being assigned a license and click next.

NetApp Management Pack Deployment
1: In vRealize Operations Manager go to the Administration -> Solutions

2: Click Add in Solutions

3: Click Browse and select the NetAppAdapter-6.0.pak. Click Upload.

4: Click Next once the file has been uploaded

5: Accept the license and click Next

6: Click Finish on the last screen

7: Next click on Licensing -> Licenses. Select the NetAppAdapter and click on Configure. Enter the license key purchased from Blue Medora and click Save.

8: Next click on Credentials -> NetApp Adapter and click on Configure. Enter credentials that have access to onCommand Manager and also vROPS. I selected the admin account for vROPS and a domain account for onCommand. Click Ok.

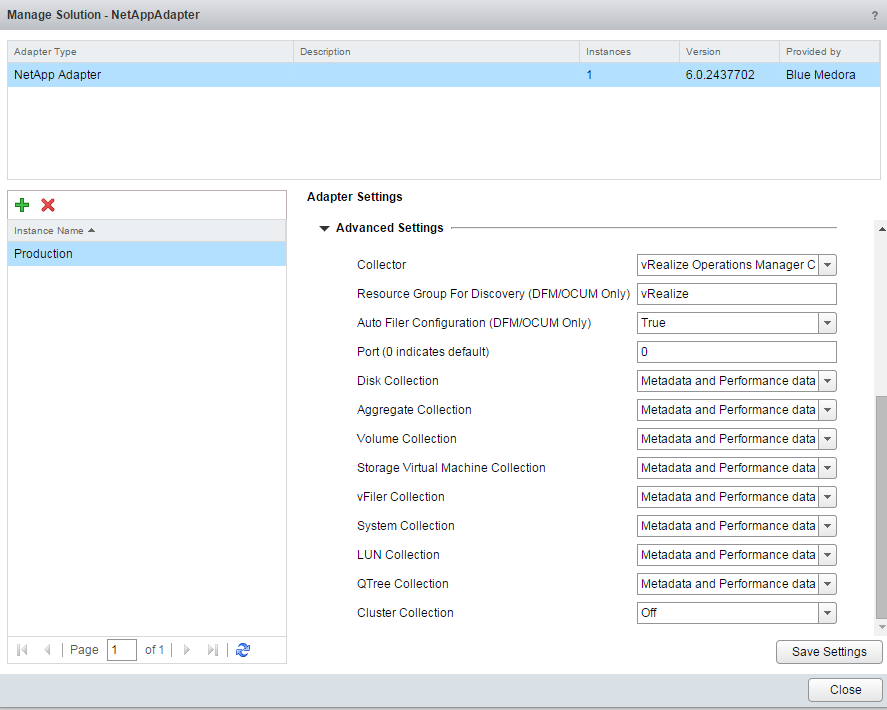
9: Next click on Solutions -> NetAppAdapter and click on Configure.

10: Enter a name of the NetApp device you want to add to the adapter. Select the NetApp credential created previously. Enter the FQDM of the OCUM/DFM host and select whether you want to connect via HTTP or HTTPS

11: DO NOT SAVE SETTINGS JUST YET!! Make sure to expand the Advanced Settings as you’ll need to enter the name of the Resource Group for Discovery. In my case I went into OnCommand and created a group with specific NetApp storage controllers. This means I’m not managing controllers I don’t need to monitor. If you purchase significant licenses for all controllers in your environment you don’t need to do this, you can just leave the Auto Discovery to true. Once you have the settings mapped out as needed click Test Connection and then Save Settings.

12: You can now start the collection for the adapter.

13: Next click on Licensing -> Licensing Groups. Select the NetAppAdapter Licensing and click on Configure.

14: Select the vCenter Operations Management Pack for NetApp and click Next.

15: Select the NetApp controllers from the filtered objects and click Add. Click Next to continue.

16: Verify the settings and click Finish

And that’s it, the management packs are installed and ready for action. As I mentioned earlier I plan in the future to write a review of the dashboard and how the management packs integrate into vROPS. I’d recommend getting your hands on a copy of the software and playing around if you have time.
Hi Derek,
Thanks for the clarification..
Hi, Just would like to know if bluemedora requires separate vmware vRops licenses to do the management pack installation? or should I say there must be a vmware vRops installed or vitual environment first for particular apps such as SAP, SQL, Oracle, SCOM, Nimble, Netapp etc…, before we can use/install the bluemedora management pack?
Hi Ardie,
Yes you will need to have vROPS installed first to take advantage of the Blue Medora packs. The management packs are downloaded as .pak files which can be imported into vROPS. vROPS can be sold with your VMware licensing such as Enterprise or Enterprise Plus or it can be purchased as a separate entity
You can find more information on vROPS here: http://www.vmware.com/au/products/vrealize-operations/pricing.If you currently have Enterprise Plus licensing you can upgrade your license to Enterprise Plus with vROPS and you can them import your new license codes into vROPS so you can leverage the monitoring and analytics features of vROPS. This will provide you with vROPS Standard features. It will also increase your license costs however.
Hope this helps
Luci — please feel free to send a note to [email protected] and someone will get right back to you to help you with any installation & configuration issues you may be having.
Thanks, Blue Medora Support
Hi Luci,
The guys at Blue Medora are super helpful and responsive so if you need to discuss your requirements before downloading definitely get in touch with them directly.
Thnx
Derek
Hi …where i can find please the.NetAppAdapter-6.0.pak link for download?
Hi Luci, you can get the .pak files from Blue Medora’s download trials page: http://www.bluemedora.com/products/vrops-management-pack-for-netapp-storage/. You need to enter a few details to get access to download the file